Dill is an annual herbaceous plant of the Umbrella family, found in the wild in the southwest and central Asia, as a garden crop is ubiquitous. Before you plant dill at home, you should consider a number of features:
- the plant loves heat and moisture;
- needs plentiful lighting, which requires the installation of energy-intensive equipment in winter;
- weakly develops on acidic soils;
- Fresh seeds grow slowly due to the high content of essential oils.

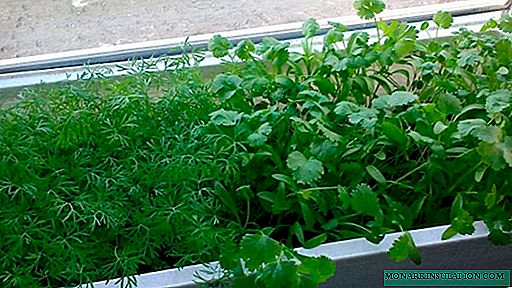
Greens sprouted at home
Important! Fresh spices on the table will be all year round, if you do not forget to sow new seeds every month.
Varieties for growing on the windowsill
How to grow dill seeds at home? Harvest time and features depend on the variety.
There are early ripe, mid-ripening or late ripe varieties:
- The early varieties of Gribovsky or Grenadier will provide quick greens or umbrellas with seeds in the room. Sowing will start early, but the crop will be poor (4-6 leaves), a short period of time will elapse between the appearance of the first leaves and umbrellas.
- Mid-season varieties (Richelieu, Umbrella, Qibray) will grow a week later, but there will be more leaves (6-10 branches).
- Late-ripe bush dill (Amazon, Alligator, Dill, Buyan, Salute) gives the latest and richest harvest (more than 10 leaves).
At home, the last option for growing dill is often used.
Growing dill on the windowsill
The best yield is given by dill from spring to August, planting without illumination forms lush greenery with high fertility of the earth and a bright window sill. In autumn and winter, plants require more attention, the cost of growing will increase due to the energy consumed. The uniformity of lighting is achieved by aluminum foil or portable screens.
If the plants lean in a certain direction, you should turn the pots 180 ° daily. The oblique growth of stems reports uneven lighting. Simultaneously with the rotation of the tanks, the lighting equipment should be adjusted in height and angle to the crop.
Fortified plants are sprinkled with earth at 3-4 weeks of growth. The method improves productivity, makes seedlings more magnificent and juicy. The process of ejecting peduncles slows down.
Fertilizing greens with liquid top dressing, the leaves should be treated with clean water, excluding burns of the processes and penetration of chemical compounds into food.
Hydroponic plant will allow to grow dill in a greenhouse on the street and indoors. Shoots usually appear after 5 days.
An important point. When the first two leaves appear, dill can abruptly stop growing, while the backlight or temperature change does not help. The reason lies in the peculiarities of the development of dill, then the vegetation of the plant is normalized, growth will continue at the usual pace.
How much dill grows in a pot
The average duration of dill seedlings after sowing is 7-12 days, greens are ready for harvesting by 6-8 weeks. Usually dill is consumed fresh, periodically breaking off the side leaves for adding to dishes. Old dill begins to pick from the top, stimulating growth and abundant harvest.
Growing dill in the winter at home
Effective cultivation of dill in an apartment in winter is possible while maintaining a temperature of 15-20 degrees (a room thermometer will help to control the indicators). If the room has a low degree, it is increased by a heater. Lighting will have to be artificially extended with a phytolamp, incandescent lamp or daylight. With the onset of cold weather, it darkens earlier and later brightens, an additional light source should work 6 hours / day. It is advisable to turn off the lamps in the winter 3 hours before sunrise and 3 hours after sunset. The lamps are placed 50 cm from the plants, observing a gap of 1 m between the lamps.

Uneven germination of dill seeds in winter
Before the first sprouts, the earth is moistened daily with a spray, preventing drying out. After waiting for the green shoots, the soil is watered every 3-4 days. A high level of humidity in the house is also achieved by spraying the shoots every 2-4 days. Fertilize the soil with Nitrofos or ammonia 2 times during the winter. More frequent top dressing makes no sense when using special soil mixtures with a high content of minerals.
The grown dill is thinned, leaving 5-10 cm gaps between the sprouts, the extracted greens are transplanted into additional pots. The rest of the care is reduced to loosening the soil and removing weeds. Harvested completely, tearing the root or cutting off the tops. In the latter case, the plant will successfully germinate again.
How to plant dill seeds at home
Seed preparation
For the rapid emergence of seedlings and the active growth of healthy plants, you will need to pre-soak the seed for several hours in a warm, unlit place. A solution of potassium permanganate, boric acid (one teaspoon of chemical composition per glass of water), hydrogen peroxide is suitable for disinfecting the culture.

Preparation of dill seeds for planting
Important! Without preliminary soaking and etching of seeds, the emergence period will increase by 5-6 days. Sowing will germinate unevenly. Preliminary seed treatment will allow seedlings to be obtained with an interval of 2-5 days, dry seeds will sprout in the time range of a maximum of 14 days.
Sowing seeds
Dill is planted immediately in large tanks or germinated seedlings with further transplantation (the first technology is suitable for beginner gardeners). It is enough to stock up on cylindrical pots with a volume of 1 liter or long rectangular containers with a height of 10 cm.
The bottom must be drained by pebbles or expanded clay. The soil is used purchased or mixed in equal proportions of turf soil with river sand. It is advisable to fertilize the soil with vermicompost or humus. Ready-made complexes of mineral fertilizers are also suitable.
The phased instructions of experts will help to properly plant dill seeds on the windowsill or balcony:
- Grooves are made in the soil at a distance of 5 cm, the depth of the notches is 2 cm.
- Soaked and pickled seeds are placed in the grooves. Sowing is recommended not very densely, for a standard oblong pot two parallel rows are enough. Moisten the soil with a spray.
- Sprinkle funnels with seeds sown with seeds and tamping is not necessary.
- The pot is placed on the windowsill, covered with a film or polyethylene.
After 5-6 days, the first germs will appear, then the film is removed, use the backlight, controlled temperature.
Plant Care Rules
Shine
A key condition for breeding green herbs at home is adequate lighting. With a lack of sunlight, plants will take on a light green hue.

Dill seedlings on the balcony
Dill needs 6 hours of sunshine per day.
Temperature
Comfort mode for greens - + 15 ... +18 degrees. Upon reaching a temperature in the room of more than +20 degrees, the illumination should be increased, otherwise the dill stalks will be elongated, lethargic and faded. After 7 days, as the first sprouts sprout, it is advisable to lower the temperature in the room or take out the crops at night on a glazed balcony. So the greens will not stretch.
Watering
In summer, sprouts need frequent watering, excluding drying out of the soil. In winter, the water evaporates more slowly, it will be necessary to moisten the earth less often (every 3-4 days). Watering the crop is recommended by melt or rainwater. Tap water is left to stand for 24 hours to remove chlorine. Dill reacts negatively to bleach, which inhibits the growth of microorganisms in the soil, which contribute to the assimilation of grassy processes of nutrients.
Spraying
Green twigs will be juicy and fleshy if the shoots are sprayed daily with water. Irrigation water should be settled at room temperature. Otherwise, the grassy culture will turn yellow.
Fertilizers
The ideal fertilizer for dill grown on poor-quality soil is Agrolife fertilizer. The solution is added to the soil at 1 teaspoon per month. An alternative is Biohumus (2-3 tablespoons of powder is enough for a month).
Thinning
Thick shoots slow down the growth of crops. The optimal distance between plants is two centimeters.
Harvesting
Harvesting is carried out 3-4 weeks after planting dill. With incomplete cutting of shoots, plucking of the lateral processes, the greens will continue to grow, develop and delight with a new crop.
In addition to the ground part, dill roots are used for cooking. It is recommended that the plants that throw the peduncle be kept on the windowsill for a week. Then the roots are dug up, washed with running water and dried. Dry roots retain useful properties throughout the year; for cooking, they are used whole or in crushed form.

Dill root
Ease of care and unpretentious dill, the ability to harvest for 2-3 weeks after germination allow you to enjoy the freshness of the grass, along with parsley and other spices, all year round. The sowing period of the hostess is chosen independently, taking into account the timing of seed maturation. For example, for harvesting in February, dill is recommended to be planted in January or December.