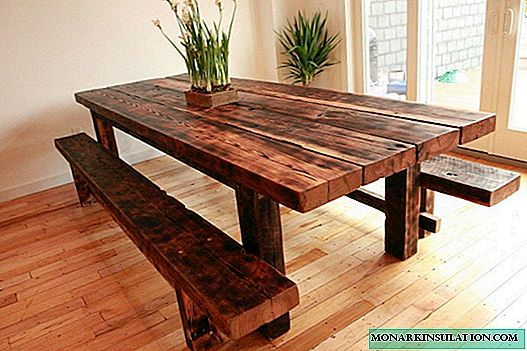
A roomy table, set on a summer cottage, serves as a gathering place for all family members. In the summer, no one wants to be indoors, no matter how beautiful and comfortable it is. Therefore, in good weather, breakfast, lunch, and dinner are usually organized in the fresh air. The availability of equipped space facilitates this task, and the absence complicates it. In order not to take furniture out of the house every time, you need to once and for all build a table for your cottage with your own hands, having purchased the necessary building materials for this. It is better to immediately worry about the benches on which it will be convenient to sit at the built table. The design of a wooden table equipped with two benches is quite simple. Any summer resident can assemble and install this product on its site. True, an experienced master will take less time to do this. After all, he just needs to look at the table layout. A summer resident starting to improve the site will have to carefully read the instructions and thoroughly understand its contents.
We are preparing a set of tools and building materials
The presence of a tool, including an electric one, will allow to carry out all operations quickly. Therefore stock up:
- circular saw (can be replaced with a hacksaw on a tree);
- a drill and a 10 mm diameter drill on wood;
- a hammer;
- with a brush;
- ring spanner for tightening nuts (12-14);
- building corner;
- tape measure and marker (pencil).
The list of building materials and fasteners:
- Lumber, namely 11 four-meter boards, the width of which is 100 mm, and the thickness is 50 mm. Six pieces of boards will need 8 pieces, while 4 "extra" meters will be left in stock.
- For fasteners you will need furniture bolts (galvanized) in the amount of 16 pieces, as well as nuts and washers.
- Galvanized nails (about a hundred) in size 3.5 to 90 mm.
To increase the life of the outdoor table in the country, you must buy an effective tool for bioprotection of wooden elements of the product.
Stage of acquaintance with drawings
In the two drawings below, a schematic representation of a wooden table in two projections (frontal and lateral) is presented. Before starting work, it is worth examining these schemes in order to accurately understand the place of each part in the entire structure.

Schematic drawing of a street wooden table for a summer residence: side view. The table is equipped with two benches that can accommodate 8 people
The details of the country table in the drawings are indicated in Latin letters:
- 4 legs of the table (the length of each part is 830 mm, given the presence of 30-degree bevels at both ends);
- 2 seat supports (length of parts - 1600 mm);
- 2 worktop support (length of parts - 800 mm);
- 14 two-meter boards needed for flooring on the table and seats;
- a cross-beam board with a length of 800 mm, which will serve as an amplifier for the table;
- 2 crossbars of 285 mm each for reinforcing bench seats;
- 2 table design amplifiers equipped with a figured cut (length of parts - 960 mm).
Adhere to the given sizes if you work with the dried and already planed wood. Otherwise, do not forget about the allowances that, when processing the boards, "go" into the chips.

Front view of a wooden table for a summer residence. The length of the countertops and benches is 2000 mm. Table width - 80 mm. Benches twice as narrow (40 mm)
Manufacturing stages
Sawing table details from lumber
Using a circular saw or a hacksaw, cut the required number of table elements from four-meter or six-meter boards purchased for the construction of garden furniture. Refer to the dimensions given in the drawings, diagrams. First cut the two-meter parts for the flooring of the table and benches. This will allow you to economically saw the existing lumber, minimizing the number of scraps.
Important! In order to avoid errors when cutting parts for side panels, it is recommended to cut them according to a template made in advance from cardboard in accordance with the drawing. Although for experienced craftsmen this operation will seem like an extra waste of time.
How to start the assembly?
Having finished cutting the details, you can begin to assemble our table. First mount the sidewalls, arranging all the elements in accordance with the drawing diagram. Use measuring instruments to prevent parts from skewing.

The collection of sidewalls of the street table is carried out on a flat horizontal surface. All parts are placed relative to each other strictly according to the scheme
Having placed the legs of the table at the right angle, lay the cross-beams on them, and then grab the parts with nails. Then mark the locations of the bolts and drill holes for them. Pull the table legs with furniture bolts to the horizontal elements of the tabletop and design seats.

Fastening the details of the sidewalls of the table with furniture bolts screwed with a wrench. Pre-drill holes for these fasteners
Connection of sidewalls with worktop details
This operation must be carried out with an assistant who will hold one of the sidewalls in an upright position until it is fixed. The second sidewall, respectively, you hold yourself. On the top of the supplied sidewalls, lay one of the eight flooring boards in accordance with the marked lines that you must put on the worktop support parts in advance. Attach the board with nails. Then, on the other side of the table, nail another floorboard in exactly the same way.

The frame of a wooden street table is assembled with one or two assistants holding the sidewall structures until they are fastened with countertop boards
After this, the frame of the product will stand on its own, so the need for an assistant will disappear. Do not rush to nail the remaining six boards of the countertop. Ensure rigidity of the assembled table structure using fasteners on the extreme parts of the seats. It is enough on each side to nail one-two-meter detail to the support board (horizontal take-outs) of benches.
Important! Professionals recommend using a clamp when connecting wooden parts. This is the name of a special tool that allows for temporary fixation of the elements to be connected in order to prevent their displacement during driving in nails or screwing in self-tapping screws.
Back to the installation of countertops. Prepare several identical wedges with which you can make the gaps between adjacent table parts the same. After fixing the boards with nails, remove the temporary wedges. Through the received slots-gaps in the surface of the countertop rainwater can flow freely. After the summer rain, the table and benches will quickly dry out under the influence of the sun and wind.

The assembly of the countertop of the country table is carried out with gaps between adjacent elements. The uniformity of the gaps is provided by wedges-blocks, inserted between the planks
How to install amplifiers?
To carry out the installation of all types of amplifiers for the design of the table and seats, it is necessary to turn the product upside down. So it will be more convenient to carry out the fitting of parts and their subsequent fastening. Having installed transverse amplifiers according to the diagram in the middle of the tabletop and benches, nail them with nails. This part will prevent the bending of two-meter boards of the flooring of the table and seats. Cut corners of amplifiers to save space. For the safety of people, sand all saw cuts with sandpaper or a grinding machine. A pair of amplifiers with a figured neckline that repeats the shape of the cross-section of the countertop, nail with it to it and to the sidewalls. See how this is done in the photo. In this case, it is easier to see once than to read a hundred times how to do it correctly.

The table is turned over and laid on the tabletop on a flat base in order to secure with nails to its cross-member and to the sides of amplifiers with curly cuts
If you plan to install a sun umbrella over the summer table on hot days, then provide a hole for the rack in the center of the countertop. At the same time, the arrangement of the transverse table amplifier will have to be slightly changed, having shifted the part from the center of the product by several centimeters.
Table treatment with bioprotective agent
Having assembled a wooden table for a summer residence, do not forget to carefully process all the details of the product with a bioprotective composition. Although some masters prefer to perform this operation until the assembly of the structure. In this case, it is possible to well smear the table elements from all sides. After assembly, some places become difficult to penetrate.
You can increase the aesthetic appeal of a do-it-yourself street table with the help of a color added to a bioprotective agent. Before conducting such an experiment, think and appreciate the beauty of the natural color of wood. You can shade the texture of the tree with varnish applied to the surface of the table and benches in one or more layers. Lacquer coating will provide additional protection for garden furniture from premature wear and aging.

After applying a protective and coloring composition to the surface of the details of the wooden table, it is possible to change the appearance of the product beyond recognition. Agree - it looks much more solid there
Calling guests can boast a masterpiece. After self-assembly, it is recommended to tell everyone in great detail how to build a table in the country. After all, all the difficulties and ambiguities were left behind. Now each step seems easy and understandable to you. Do not stop there. There is still much to build on the summer cottage, there would be a desire.


